

Set up the label feed in Google Merchant Center and Meta
On this page
The label feed gives every product a label naming its Lift group, such as "tapper best seller" or "tapper no sales". Your campaigns follow the labels, and products move between groups by themselves every day. You add one link, once. Tapper changes nothing in Google Ads, Merchant Center or Meta.
What you need
- An Owner, Admin or Manager login to the workspace.
- Access to the Google Merchant Center behind your Shopping and Performance Max campaigns.
- For Meta: access to your catalogue in Meta Commerce Manager.
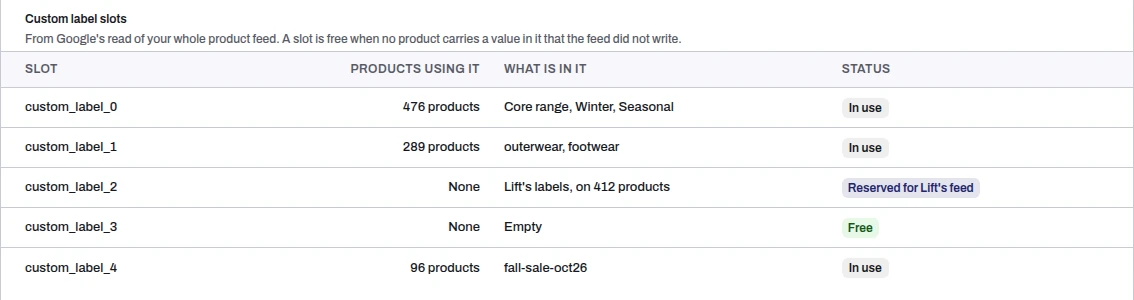
- One free custom label, custom_label_0 to custom_label_4. Tapper shows which are free.
Step 1: create the feed in Tapper
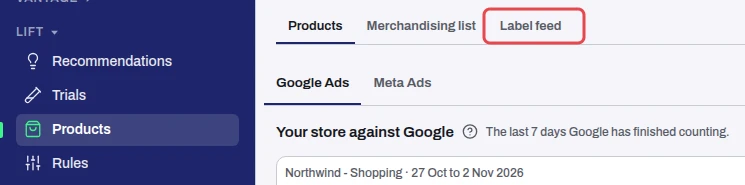
- Open Lift > Products > Label feed tab, and pick the Google Ads account at the top.
- Under Custom label slots, find a slot marked Free. In use means your own labels are in it, and Reserved for Lift's feed means Lift's feed already writes there. Tapper never writes over your own labels.
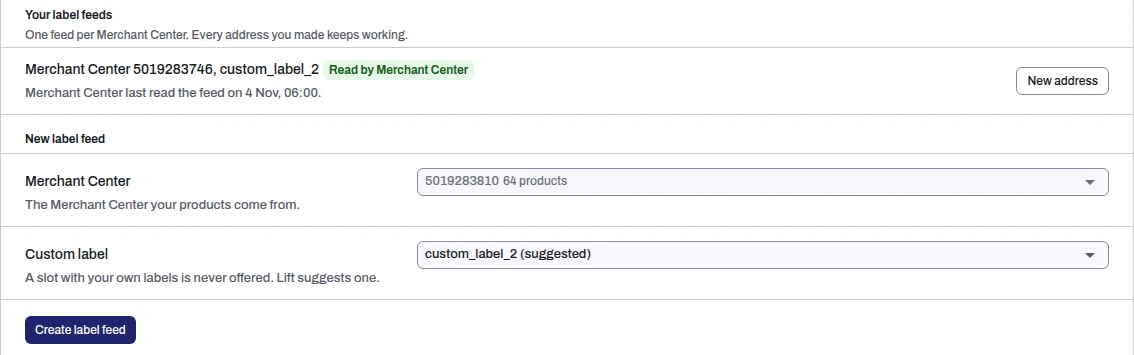
- Under New label feed, pick your Merchant Center and the Custom label (Tapper suggests one), then press Create label feed. The Set up your label feed list at the top has the same button on the row of each Merchant Center without a feed.
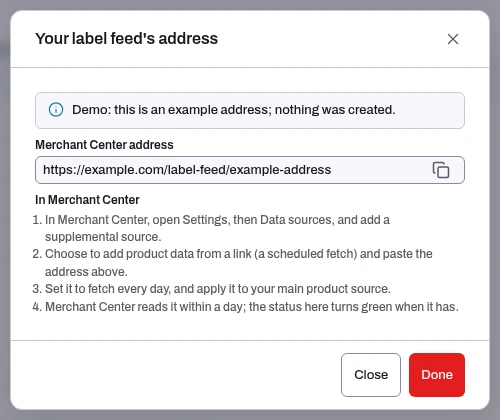
- Copy the Merchant Center address and the Meta address now: they are shown only once. If you lose them, press New address beside the feed. The old address keeps working.
Step 2: add it to Google Merchant Center
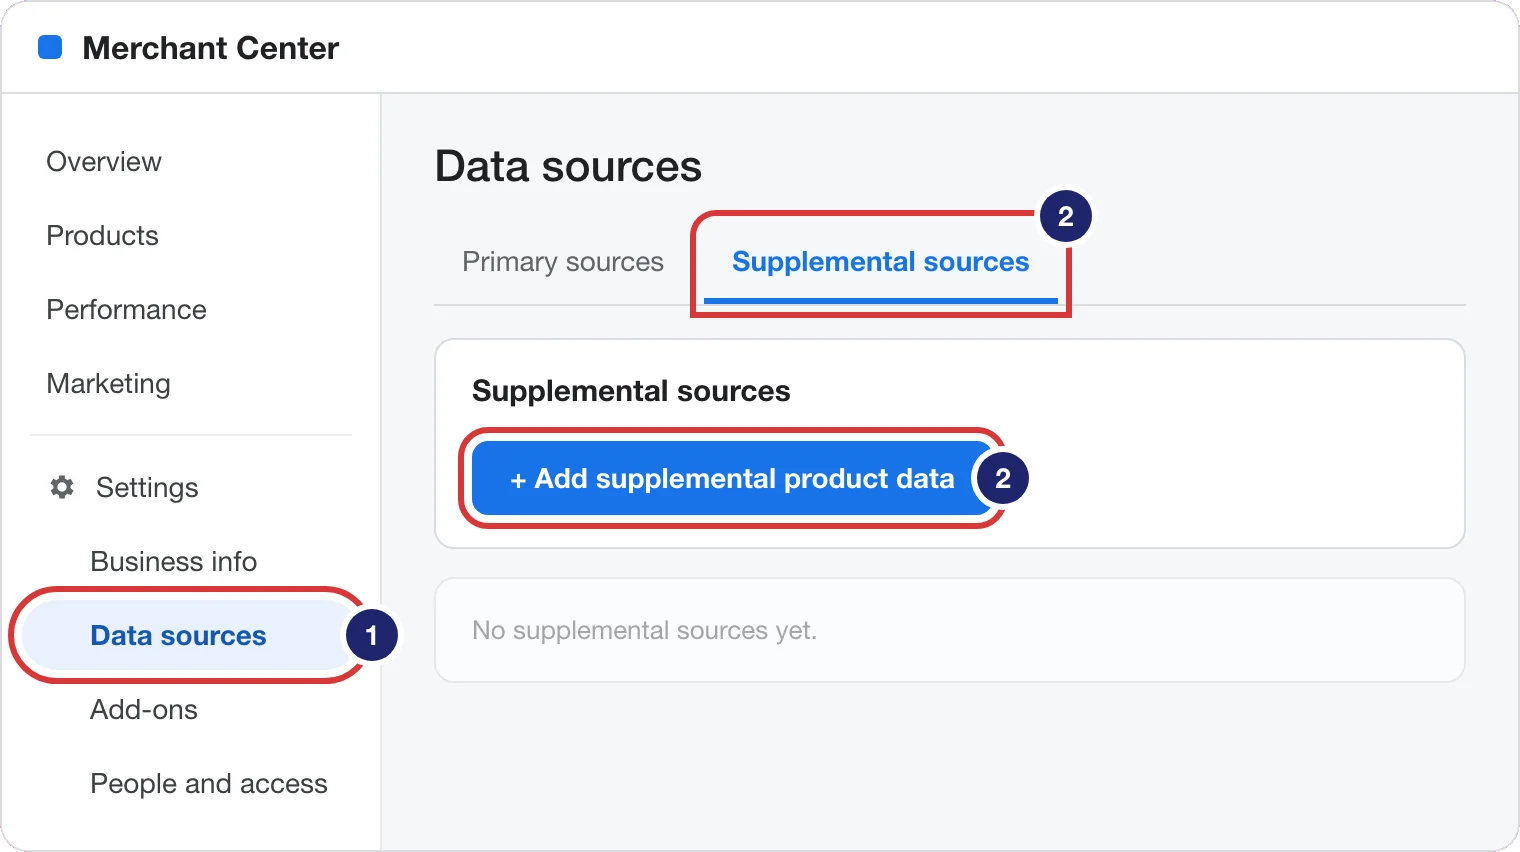
- In Merchant Center, open Settings (the gear), then Data sources.
- On Supplemental sources, press Add supplemental product data.
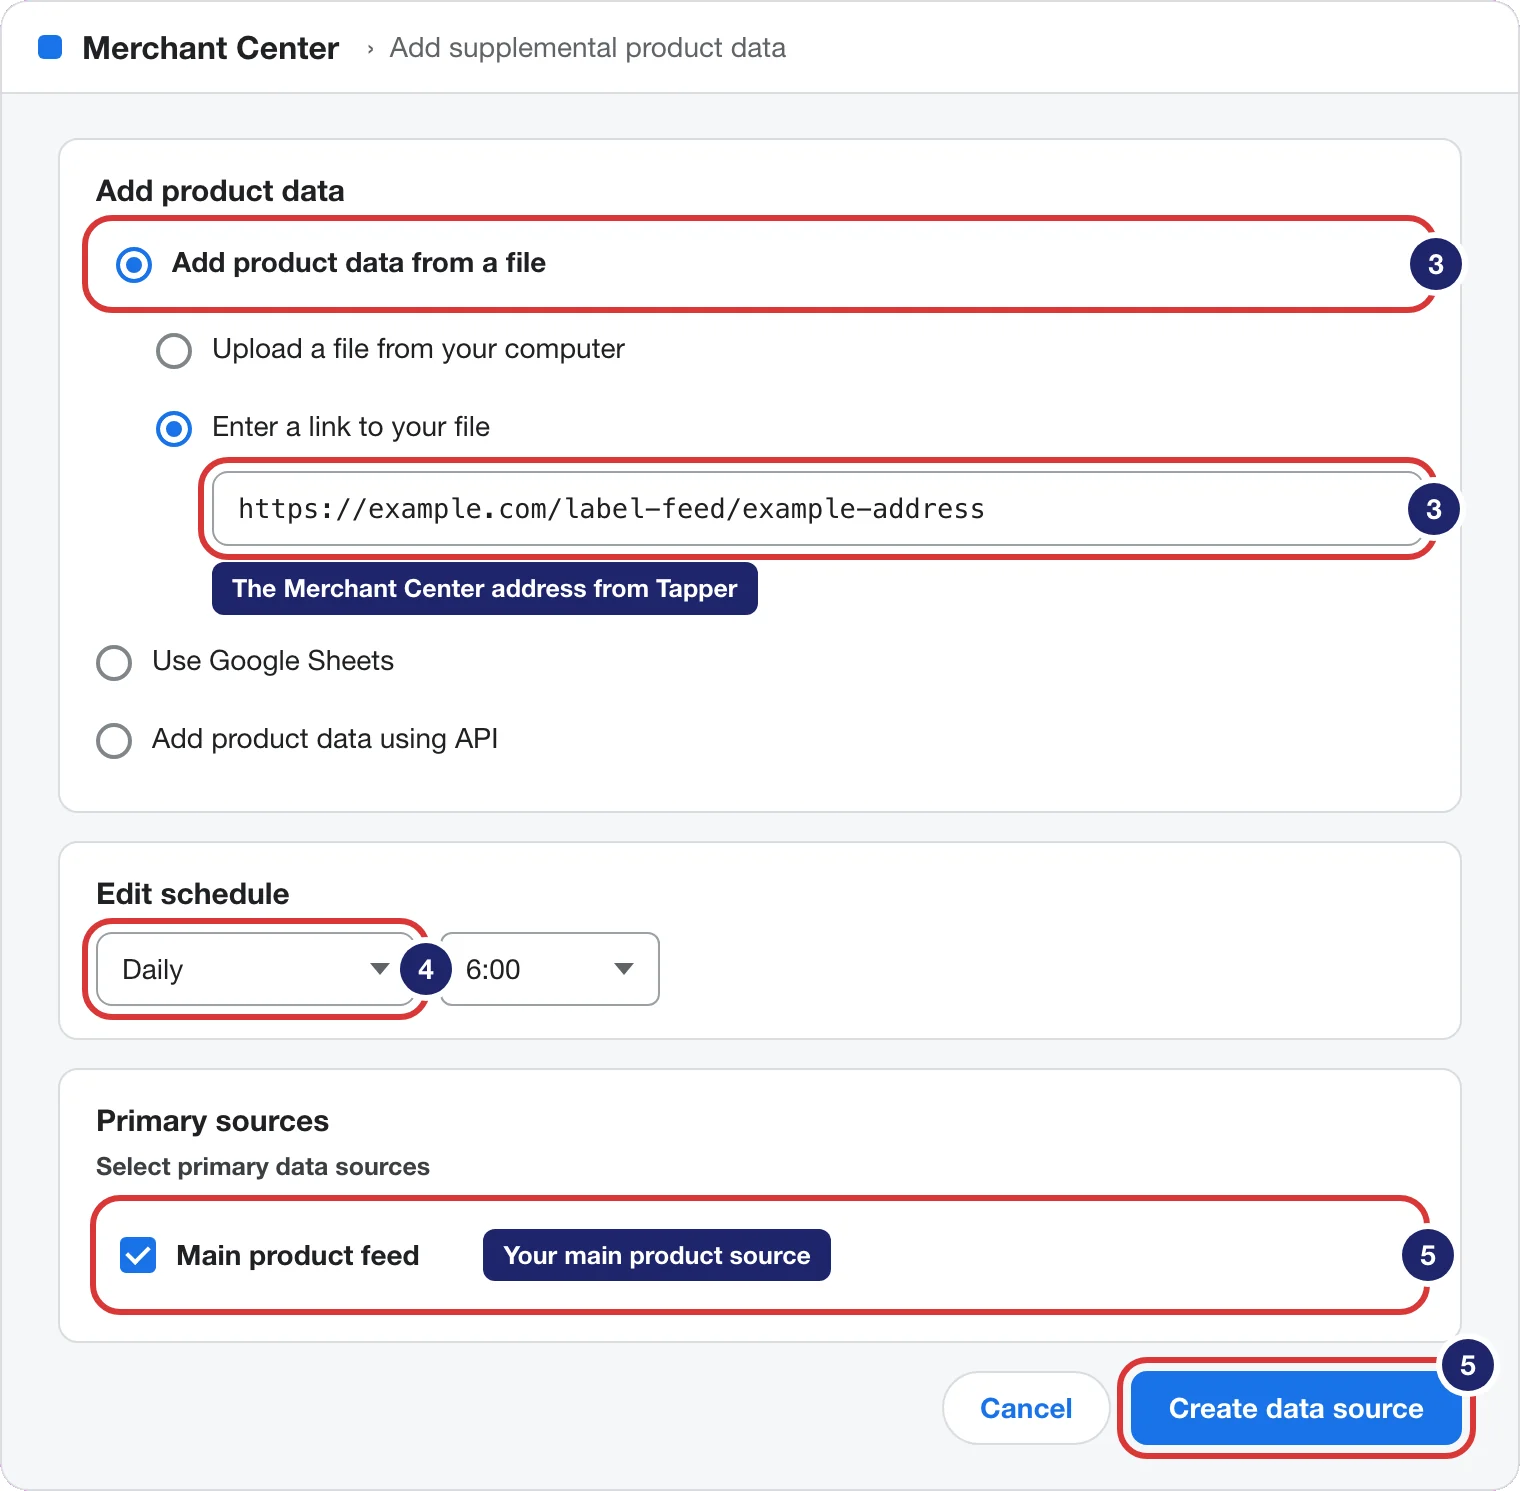
- Choose Add product data from a file, then Enter a link to your file, and paste the Merchant Center address.
- Under Edit schedule, set Daily.
- Under Select primary data sources, tick your main product source and press Create data source.
Merchant Center reads it within a day. The feed then shows Read by Merchant Center in Tapper, with the last read time.
Step 3: add it to Meta Commerce Manager
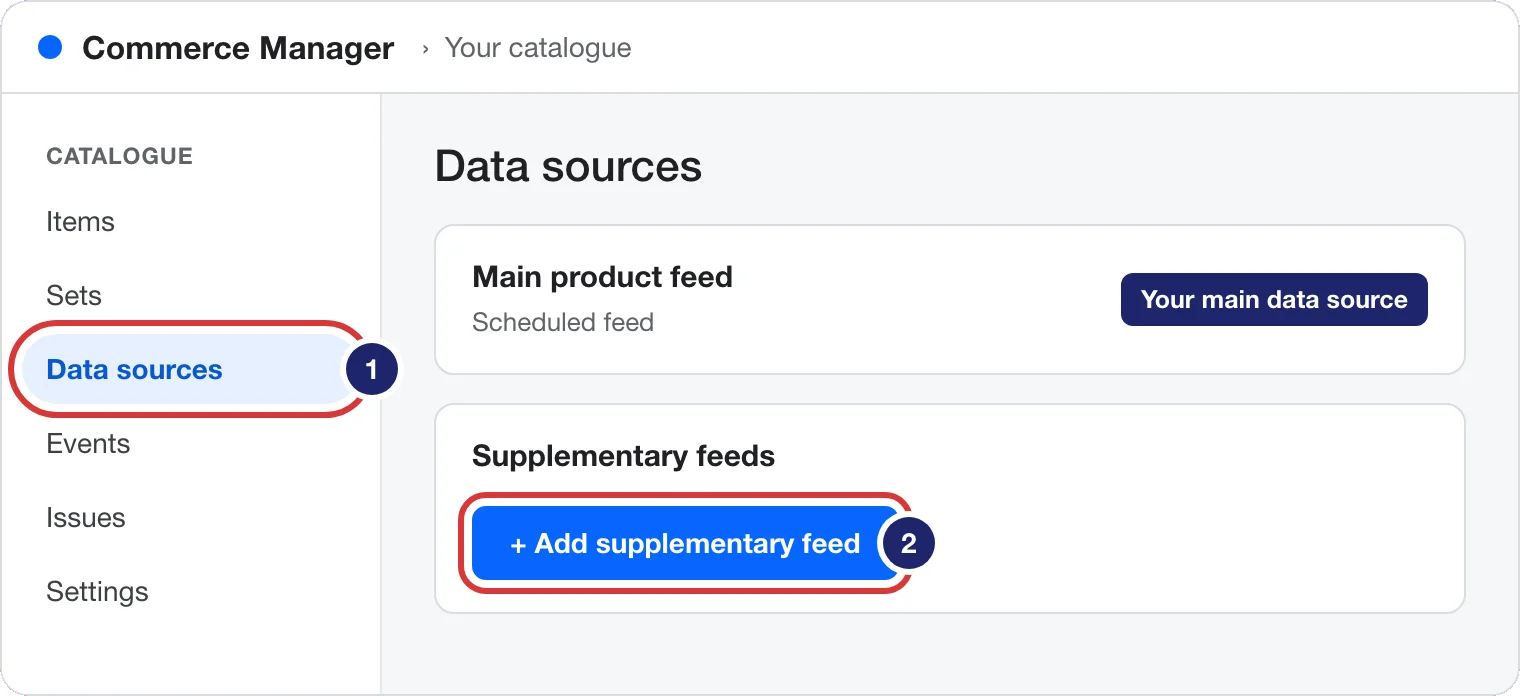
- In Commerce Manager, open your catalogue, then Data sources.
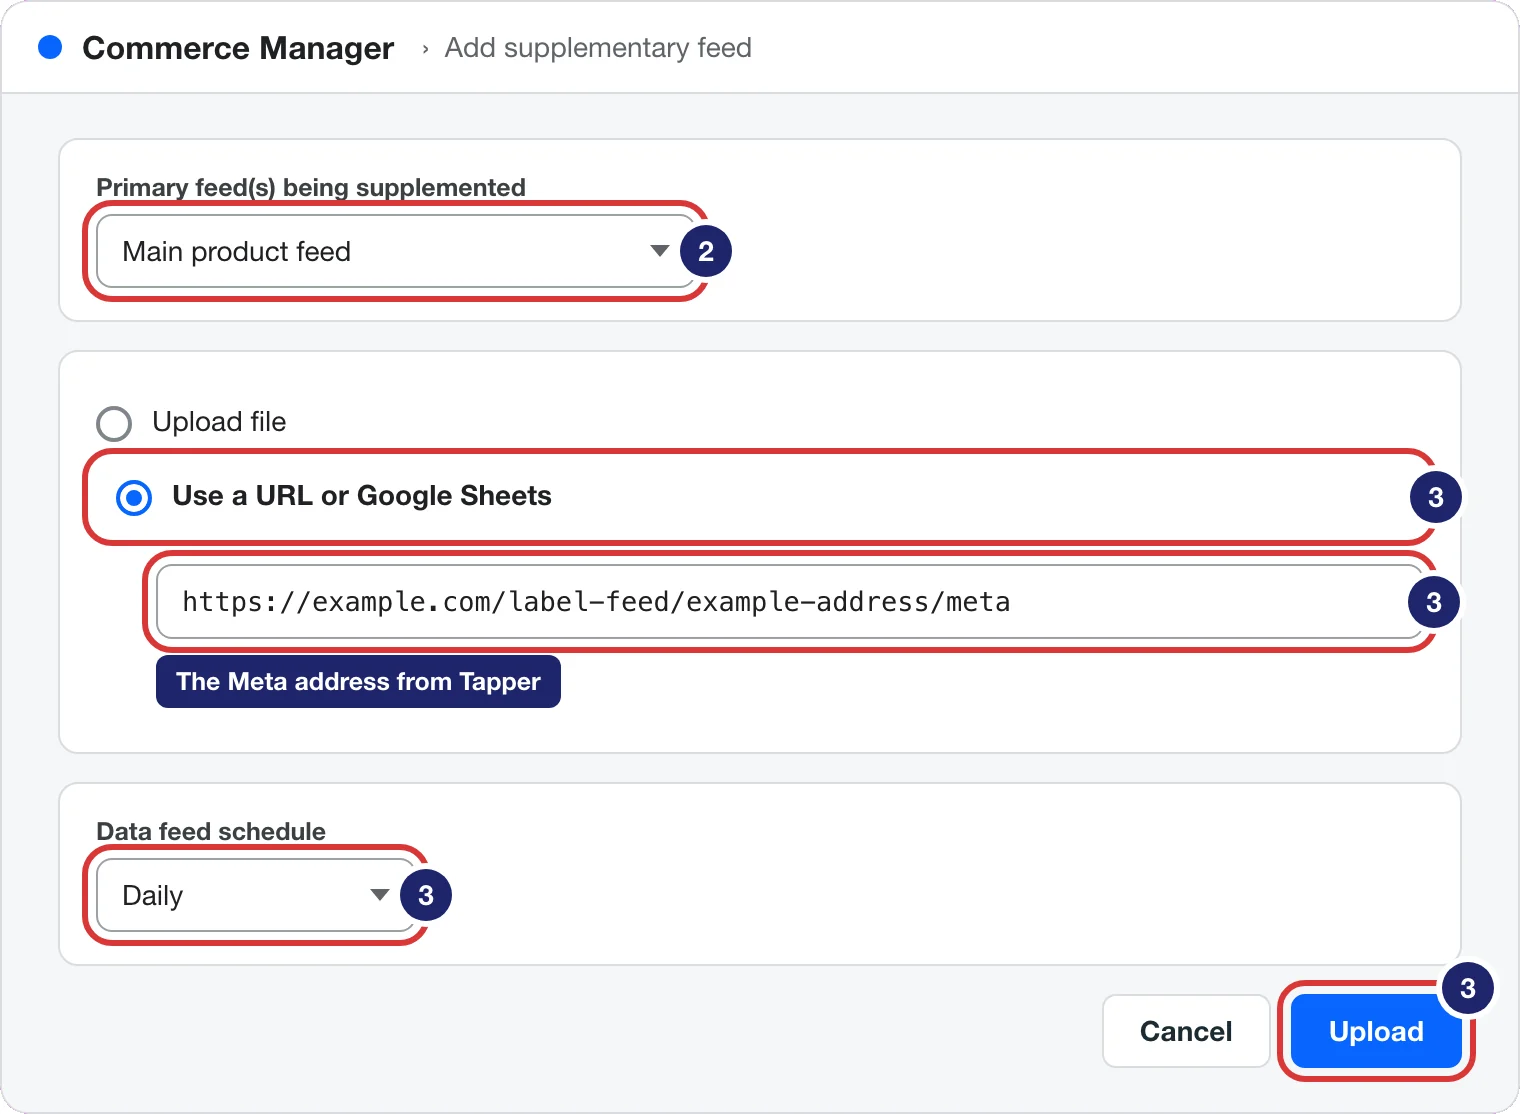
- Press Add supplementary feed, and under Primary feed(s) being supplemented pick your main data source.
- Choose Use a URL or Google Sheets, paste the Meta address, set Data feed schedule to Daily and press Upload.
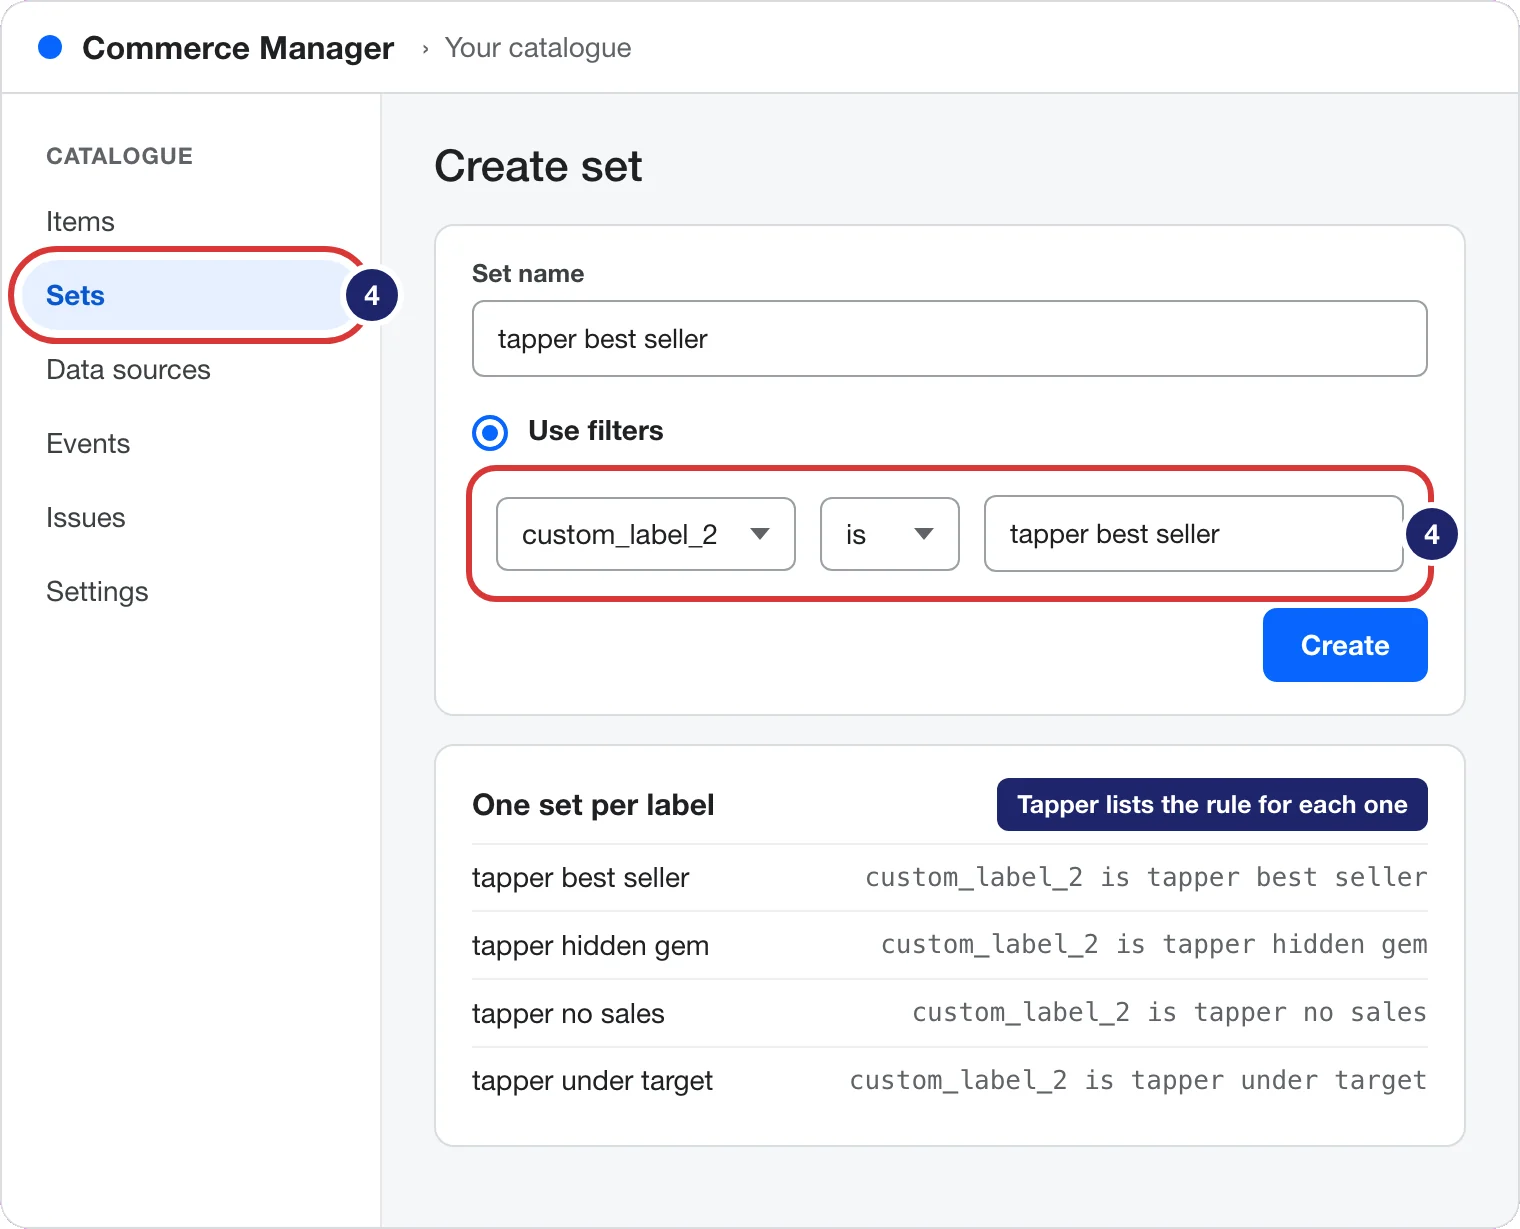
- In Sets, make one product set per label. Tapper lists each rule, such as "custom_label_2 is tapper best seller".
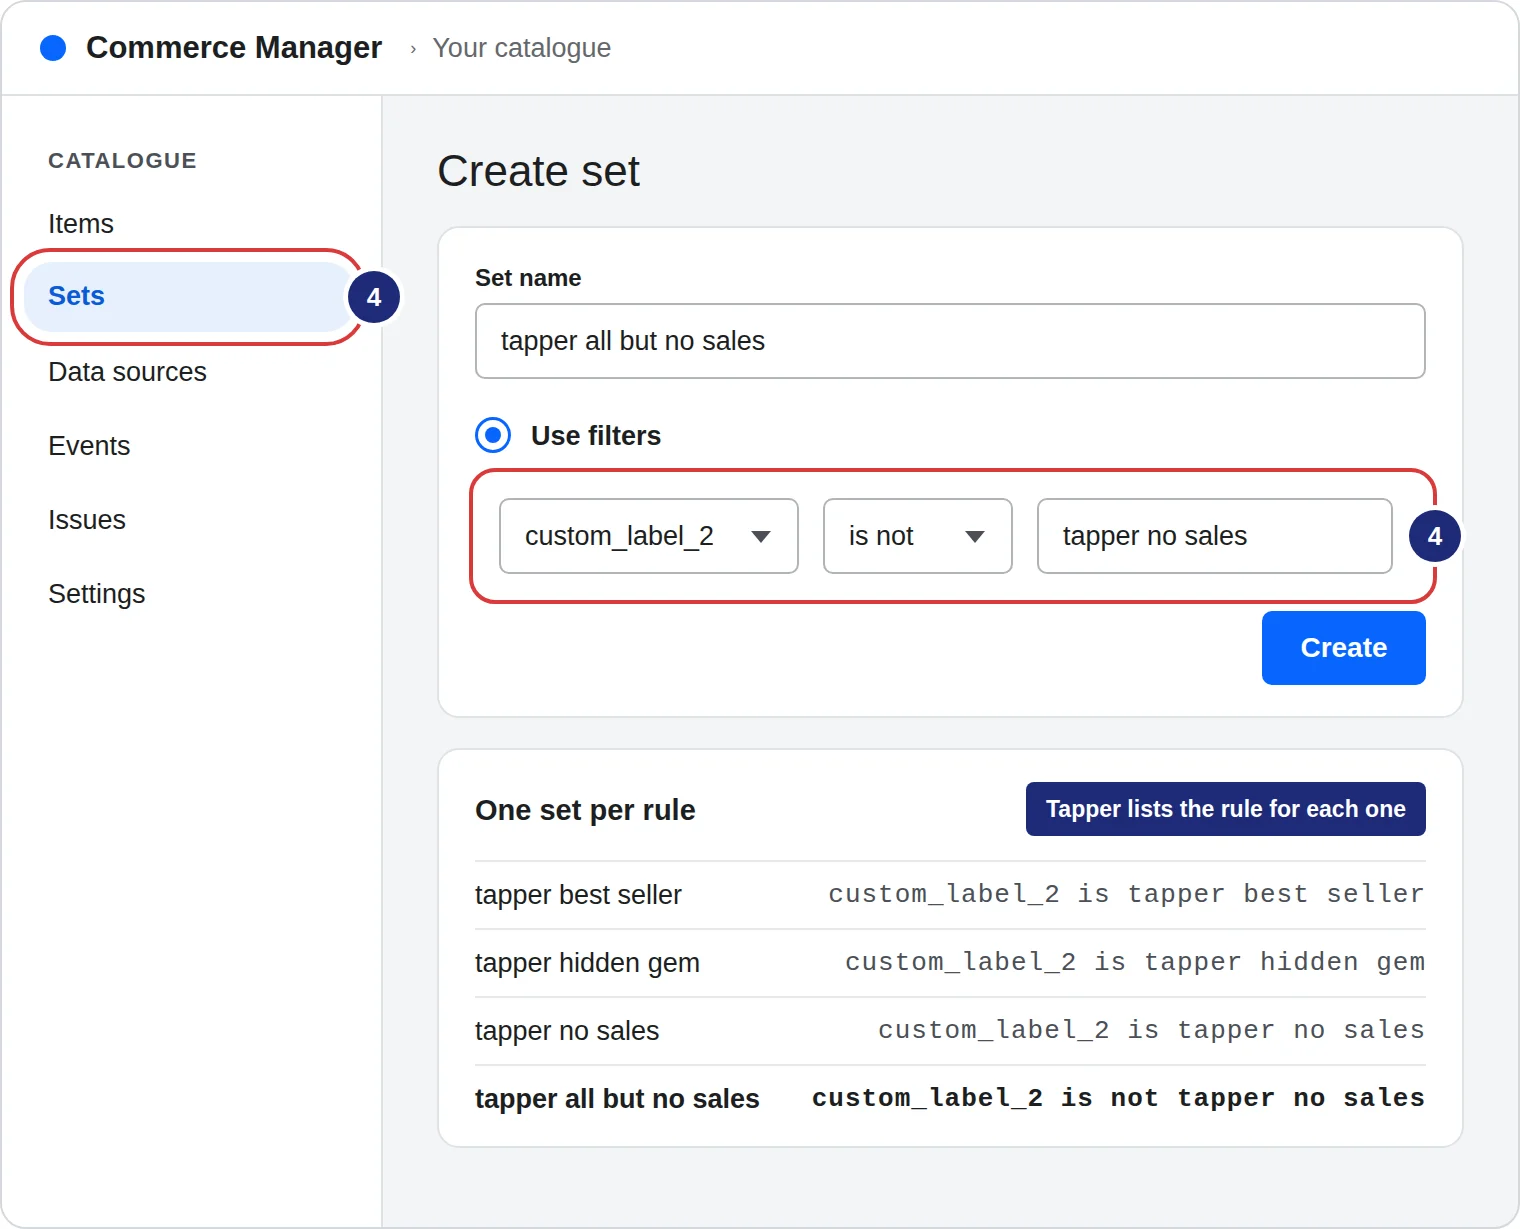
- Make one more set, tapper all but no sales, with the filter custom_label_2 is not tapper no sales (listed last). It holds every product except no sales ones, including unlabelled products such as those on hold.
Step 4: use the labels in your campaigns
Google Performance Max
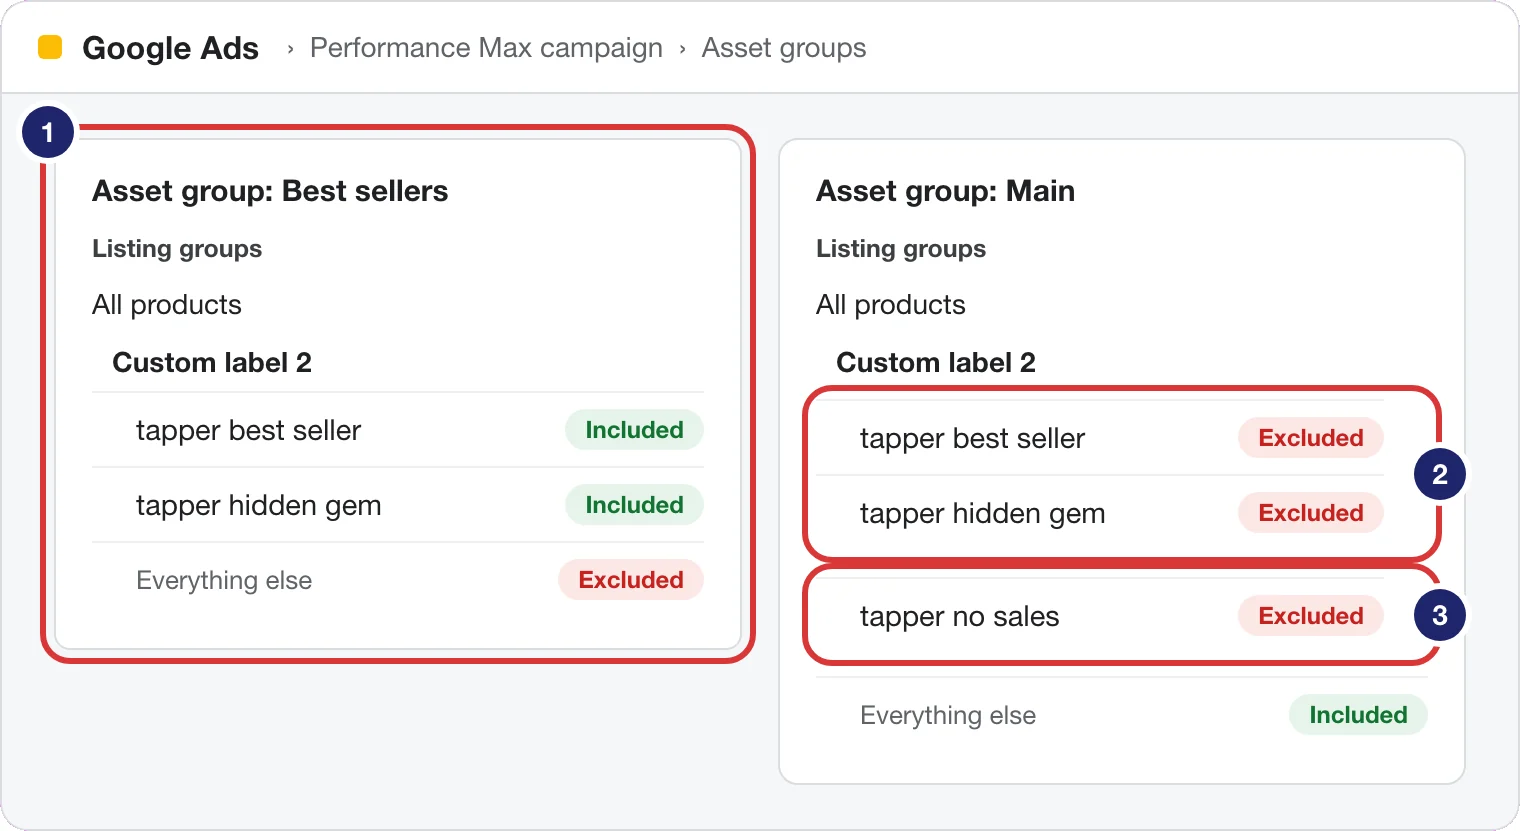
- Make a best sellers asset group whose listing group takes tapper best seller and tapper hidden gem.
- Leave those two labels out of your main asset group, so they never compete.
- Leave tapper no sales out everywhere.
Meta catalogue ads
- Run the tapper best seller set on its own.
- Use tapper all but no sales for your other catalogue ads. Meta cannot leave one set out of an ad that uses another, so this set keeps the no sales products out.
The labels
- tapper best seller: run it on its own.
- tapper hidden gem: add it to your best sellers.
- tapper no sales: leave it out.
- tapper under target: keep it and watch it.
- tapper priority: products you push on your merchandising list.
- tapper new arrival, tapper nobody sees, tapper rest, tapper comes back, tapper sold out and tapper trending: no change.
Products on hold carry no label. Every group's rule: The product groups.
If something looks wrong
- Waiting for Merchant Center after a day: check the source applies to your main product source and fetches daily.
- Stopped: your own labels are now in the feed's slot, so the feed publishes nothing and writes over none of them. Press New address: Lift moves the feed to a free slot, and you point your campaign and product set filters at that custom label. The address already in Merchant Center keeps working.
- A Meta product set is empty: the feed labels only products already in your catalogue. Contact support from this page and we match your catalogue's product ids.
Related
Was this helpful?
Still need help?
Chat with our team and mention this article.